Color calibration
For many imaging tasks it is desired or even required to have correct color reproduction. Due to the fact that characteristics of color filters installed on camera sensors don’t exactly match with light spectrum sensitivity of human eye (or with display emission spectrum, or with printing technology), resulting RGB values after a demosaicing processing step have to be adjusted to represent real life colors. This task can’t be done perfectly, but there are ways to get close. Mathematically there are two most common approaches to the color correction task:
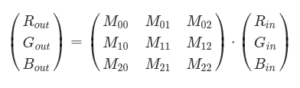
1. Multiplying 3×3 color matrix and a vector of RGB values in camera color space to get resulting RGB values in some defined color space (e.g. sRGB). This operation is simple (which means it is fast) and linear (which has some advantages in terms of being applicable in wider range of lighting conditions).
2. Building on top of previous approach, it is possible to add another processing step – applying 3D LUT. Adobe DNG specification describes such processing pipeline, specifically there is a HueSatMap mapping table, which is applied in HSV color space with ProPhotoRGB primaries. This additional step allows to get much closer to the real colors, but requires more processing power and is more demanding to the color calibration procedure.
Independently from that there are also several choices of how calibration process can be done:
- Calibration is performed once with some chosen lighting conditions (e.g. D50 standard illuminant) and is used with all scenes.
- Calibration is performed two (or more) times with different lighting conditions (e.g. A and D65 standard illuminants) and correction matrix (and LUT, if used) is chosen (or interpolated) based on the current camera white balance settings.
- Calibration is performed on-site with real lighting conditions. This option creates the best match to the real colors, but requires more effort and not always possible, e.g. due to varying lighting conditions outside.
Calibration process is based on acquiring an image of known (precisely measured by spectrometer) colors, that come in a form of color checker target. Most commonly used is a standard 24-patch color reference target (e.g. Calibrite ColorChecker Passport Photo 2) and it’s the default option for described below workflow.
MRTech IFF SDK supports both color correction options (matrix and LUT) by means of cuda_processor component (see its color_correction and huesatmap filters, with usage example provided in the default configuration file of the imagebroker sample application). Furthermore IFF SDK package contains spectraprofiler sample application, which streamlines the calibration process. Currently the main use-case is creation and application of single-illuminant color profiles (calibration process choices 1 and 3 above), while dual-illuminant profiles can still be created manually and applied with fixed white balance in IFF SDK pipeline. Support for dual-illuminant color profiles in IFF SDK will be improved in the future, while this article will carry on with description of single-illuminant color calibration workflow in IFF SDK.
Prerequisites
- MRTech IFF SDK package. In the instructions below replace
<IFF_SDK_ROOT>with the path to where it is located. - Supported camera (GenICam-compatible or MIPI/GMSL), with drivers (or/and GenTL producer library) installed on the system used for calibration process.
- Color reference target (e.g. Calibrite ColorChecker Passport Photo 2).
- NVIDIA GPU, with vendor drivers installed. It is possible to proceed without NVIDIA GPU (currently except for application of LUT), but for simplicity it is not described in this article. Please contact MRTech support for instructions for that specific case.
Linux
The following scripts were designed for Debian-based Linux distributions and tested on Ubuntu 22.04:
- Install OpenCV 4.9.0:
bash <IFF_SDK_ROOT>/samples/04_color/linux/install_opencv.sh - Install additional dependencies:
bash <IFF_SDK_ROOT>/samples/04_color/linux/install_coloric_deps.sh
Windows
Due to various mutual incompatibilities between OpenCV, CUDA and MS Build Tools at the time when this article was written, usage of the latest versions of MS Build Tools and CUDA resulted in build failures. So some older versions had to be used for a working setup, specifically this combination works and is suggested to be used:
-
Install MS Build Tools 17.8 or older using the following installer, choose “Desktop development with C++” configuration during the installation process: https://aka.ms/vs/17/release.ltsc.17.8/vs_buildtools.exe
-
Install CUDA 12.3.2 (or older) by downloading the installer from this web page: https://developer.nvidia.com/cuda-12-3-2-download-archive
-
Install Python 3.12 by executing the following command:
winget install Python.Python.3.12 -
Execute the following command in Microsoft PowerShell (answer “Y”):
Set-ExecutionPolicy -Scope CurrentUser RemoteSigned -
Install OpenCV 4.9.0 by choosing “Run with PowerShell” entry from the context menu of the following file:
<IFF_SDK_ROOT>\samples\04_color\windows\install_opencv.ps1 -
Set
OpenCV_DIRenvironment variable to the value printed by the script from the previous step:<IFF_SDK_ROOT>\samples\04_color\windows\install -
Install additional dependencies by choosing “Run with PowerShell” entry from the context menu of the following file:
<IFF_SDK_ROOT>\samples\04_color\windows\install_coloric_deps.ps1
Video walkthrough
The following video illustrates the next steps (described below) in case of Windows operating system:
Building
Linux
cd <IFF_SDK_ROOT>/samples/04_color
mkdir build
cd build
cmake ..
cmake --build .
Windows
Run in PowerShell:
$VS_INSTALL_PATH="${env:ProgramFiles(x86)}\Microsoft Visual Studio\2022\BuildTools"
Import-Module "${VS_INSTALL_PATH}\Common7\Tools\Microsoft.VisualStudio.DevShell.dll"
Enter-VsDevShell -VsInstallPath "${VS_INSTALL_PATH}" -DevCmdArguments "-arch=x64 -host_arch=x64"
cd <IFF_SDK_ROOT>\samples\04_color
mkdir build
cd build
cmake -DCMAKE_BUILD_TYPE=RelWithDebInfo -G Ninja ..
cmake --build .
Add <IFF_SDK_ROOT>\samples\04_color\windows\install\x64\vc17\bin directory to the PATH environment variable, as suggested in the output of first cmake command above. You will have to re-launch the PowerShell for this change to take effect, which is required for next steps.
Configuring
Adjust element with ID cam in bin/spectraprofiler.json configuration file according to the used camera. In case of XIMEA camera it’s enough to replace <CHANGEME> with camera serial number. For other camera types please see MRTech IFF SDK technical manual and our article about camera types.
The following files define the color checker target and should be replaced if other than standard 24-patch color reference target is used:
bin/layout.cht– chart layout description in .cht format (most common options are provided with ArgyllCMS inrefdirectory).bin/layout.json– optional dcamprof-specific chart layout description (most common options are provided indcamprof/data-examplesdirectory).bin/reference.cie– reference spectra .cie file (most common options are provided indcamprof/data-examplesdirectory).
Edit bin/coloric.json, if necessary:
calibration illuminant– specify illuminant, if known. It is used mainly for white balance temperature calculation and doesn’t affect the resulting colors.unique camera name– will be stored in resulting DCP file as metadata, useful for ensuring, that correct color profile is used. Standard format of this string is vendor name, white space, camera model name.profile name– will be stored in resulting DCP file as metadata, useful if several profiles are generated for the same camera. Set it to any string.dcamprof opt dcp– with default “make-dcp -o standard” setting produced color profile will include a LUT (HueSatMap) and won’t be compatible with matrix-only color correction. This option produces best results. For compatibility with faster matrix-only color correction one can use “make-dcp -o standard -E”, which still leaves LUT as an optional additional step to improve colors, or “make-dcp -o standard -L” to remove LUT altogether.dcamprof opt json– replace with “make-profile” iflayout.jsonfile is not provided for the color checker target.
Running
cd bin
./spectraprofiler
Profiling
- Re-create the desired lighting conditions (e.g. light temperature) for the color checker target.
- Point the camera at the color checker, adjust lens focus and aperture.
- Under-exposed and over-exposed areas will be blinking. Adjust the exposure by pressing 1 (decrease) and 2 (increase) on the keyboard (the window with the image should be in focus, click on it with the left mouse button, if it’s not). The target is to have all color patches (squares) correctly exposed (not blinking). Other areas, including the dark space between the patches, may still blink, this is normal.
- Press Tab key on the keyboard and wait for a new window to appear.
- Optional: select the color checker by clicking and dragging with the mouse. All color patches should be inside the drawn rectangle.
- Double-click with the left mouse button anywhere on the image.
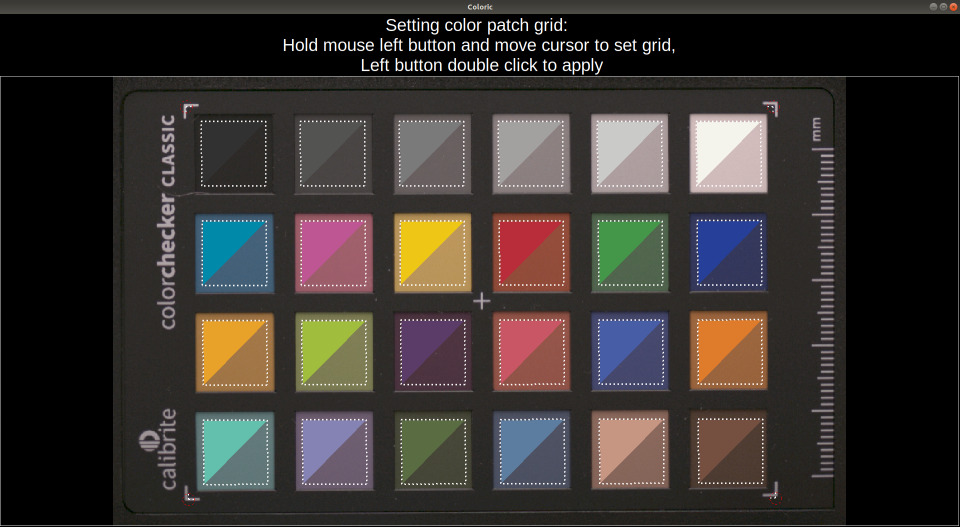
- Place the color checker grid over the image by clicking and dragging with the left mouse button.
- Adjust the corners of the grid by clicking and dragging them with the left mouse button, so that all drawn squares are completely inside the patches with the same color on the captured image.
- Double-click with the left mouse button anywhere on the image.
- Wait for the “Done” message at the top of the window.
- Double-click with the left mouse button anywhere on the image. The window should close.
- A DNG color profile file
color_profile.dcpwill have been written to the sub-directory of the current (<IFF_SDK_ROOT>/samples/04_color/build/bin) directory, named with the current timestamp. Its path can be found in the terminal output. - Press Esc key on the keyboard to exit the application.
Using the profile
The resulting color profile can be fed into the IFF SDK pipeline using color/dcp_file parameters of cuda_processor and xiprocessor components. An upcoming Vulkan processing IFF SDK component will also support this feature. In addition, dng_writer component supports dcp_file setting for embedding the profile into the written DNG files.
As an example let’s apply the color profile in imagebroker IFF SDK sample application:
- Build
imagebrokerapplication by following the same instructions as in “Building” section above, but replacing04_colorwith02_export. - Copy
color_profile.dcpfile (produced by following the instructions in the “Profiling” section above) to<IFF_SDK_ROOT>/samples/02_export/build/bindirectory. - Adjust
color/dcp_fileparameter ofcuda_processorelement fromBT709.dcptocolor_profile.dcpin<IFF_SDK_ROOT>/samples/02_export/build/bin/imagebroker.jsonconfiguration file. - In the same configuration file adjust element with ID
camaccording to the used camera (like it was done forspectraprofilerapplication in “Configuring” section above). - Start the application:
cd <IFF_SDK_ROOT>/samples/02_export/build/bin
./imagebroker
Conclusion
Color correction is an important part of a modern machine vision image processing pipeline and MRTech IFF SDK provides an easy to follow workflow for calibration and color profile application. Compatibility with DNG standard means, that written by IFF SDK raw images also can be imported into third-party software with correct colors.
If you would like to know more or try the described procedure yourself, feel free to get in touch with MRTech team at the usual places, like support@mr-technologies.com email.
IFF SDK free test drive
Getting started