Glass-to-glass latency measurement
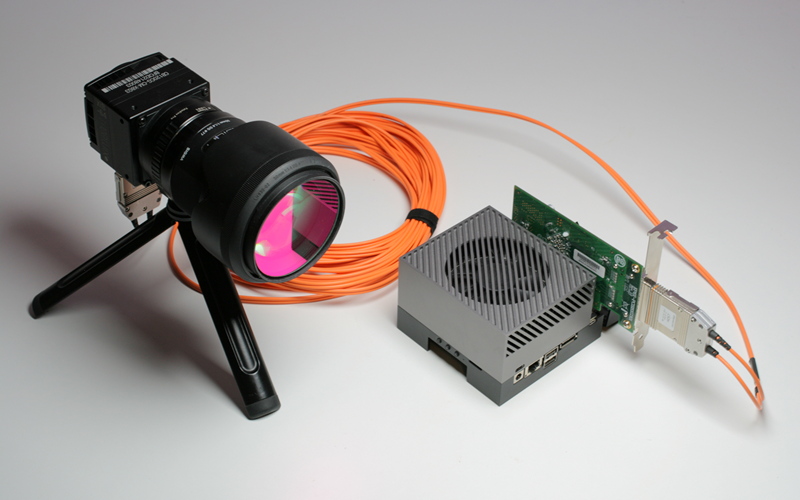
In the previous paper, we demonstrated how to start a network stream from the camera connected to Jetson Orin board using MRTech IFF SDK and its sample `farsight` application. In this paper, we will describe how to measure glass-to-glass latency using Jetson Orin board as the transmitting side and a Windows laptop with Nvidia GPU running another IFF SDK sample application called `imagebroker` as the receiving side. Glass-to-glass latency is the time delay between the moment light hits the camera sensor and the moment the camera image is displayed on the viewer’s screen. Glass-to-glass latency is the crucial parameter for various applications like teleoperation and augmented reality systems. To measure glass-to-glass latency you will also need a precision clock. In our case, we use Mitxela clock. Time on this clock is displayed with 10 milliseconds accuracy.
First, you need to install some prerequisite packages on your Windows laptop.
Install Microsoft Power Shell. Open Windows Command Prompt and execute the following command:
> winget install Microsoft.PowerShell
Now download and install Microsoft Visual Studio build tools:
https://aka.ms/vs/17/release/vs_BuildTools.exe
Choose “Desktop development with C++” configuration during the installation process.
Download and install Nvidia CUDA from https://developer.nvidia.com/cuda-downloads.
Now you are ready to download the IFF SDK package and build `imagebroker` sample application. If you haven’t purchased the IFF SDK package yet, you can contact MRTech SK, request a trial version and get a download link.
Download and extract the IFF SDK package zip archive.
Now you need to build and install OpenCV library using PowerShell script located in the `imagebroker` sample application directory:
Right-click on <IFF_SDK_ROOT>\samples\02_export\windows\install_opencv.ps1 and choose `run with PowerShell`.
Change “<IFF_SDK_ROOT>” to the actual directory where you extracted the IFF SDK zip archive.
After OpenCV library has been built and installed, set OpenCV_DIR Windows environment variable to <IFF_SDK_ROOT>\samples\02_export\windows\install.
Again, change “<IFF_SDK_ROOT>” to the actual directory where you extracted the IFF SDK zip archive.
Now everything is ready to build `imagebroker` IFF SDK sample application. Open PowerShell and run the following commands:
> $VS_INSTALL_PATH="${env:ProgramFiles(x86)}\Microsoft Visual Studio\2022\BuildTools"
> Import-Module "${VS_INSTALL_PATH}\Common7\Tools\Microsoft.VisualStudio.DevShell.dll"
> Enter-VsDevShell -VsInstallPath "${VS_INSTALL_PATH}" -DevCmdArguments "-arch=x64 -host_arch=x64"
> cd <IFF_SDK_ROOT>\samples\02_export
> mkdir build
> cd build
> cmake -DCMAKE_BUILD_TYPE=Release -G Ninja ../
> cmake --build .
Change “<IFF_SDK_ROOT>” here to the actual directory where you extracted the IFF SDK zip archive.
Add <IFF_SDK_ROOT>\samples\02_export\windows\install\x64\vc17\bin to your PATH system environment variable.
Now modify imagebroker.json config file located in the <IFF_SDK_ROOT>\samples\02_export\build\bin directory to receive, decode and render network stream from Jetson Orin board:
{
  "IFF": {
    "devices": [
      {
        "id": "cpu_dev",
        "type": "cpu"
      },
      {
        "id": "cuda_dev",
        "type": "cuda"
      }
    ]
  },

  "chains": [
    {
      "id": "main",

      "elements": [
        {
          "id": "cam",
          "type": "rtsp_source",
          "cpu_device_id": "cpu_dev",
	  "url": "rtsp://<BOARD_IP>:8554/cam"
        },
        {
          "id": "dec",
          "type": "decoder",
          "cpu_device_id": "cpu_dev",
          "gpu_device_id": "cuda_dev",
	  "decoder_type": "nvidia",
          "max_processing_count": 4
        },
        {
          "id": "exporter",
          "type": "frame_exporter",
          "device_id": "cuda_dev"
        }
      ],
      "connections": [
        { "src": "cam", "dst": "dec" },
        { "src": "dec", "dst": "exporter" }
      ]
    }
  ]
}
Change “<BOARD_IP>” to the actual IP the address of Jetson Orin devkit. In our case, Windows laptop and Jetson Orin devkit are connected to the same local network via a network switch.
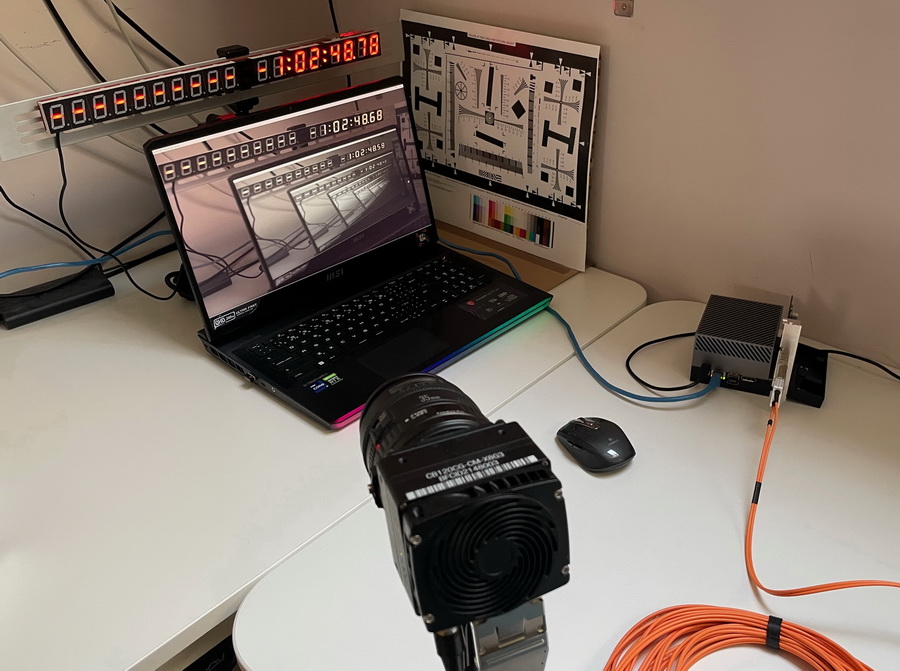
As a next step, you need to prepare your setup with the camera, Jetson Orin devkit, laptop and a precision clock to measure glass-to-glass latency.
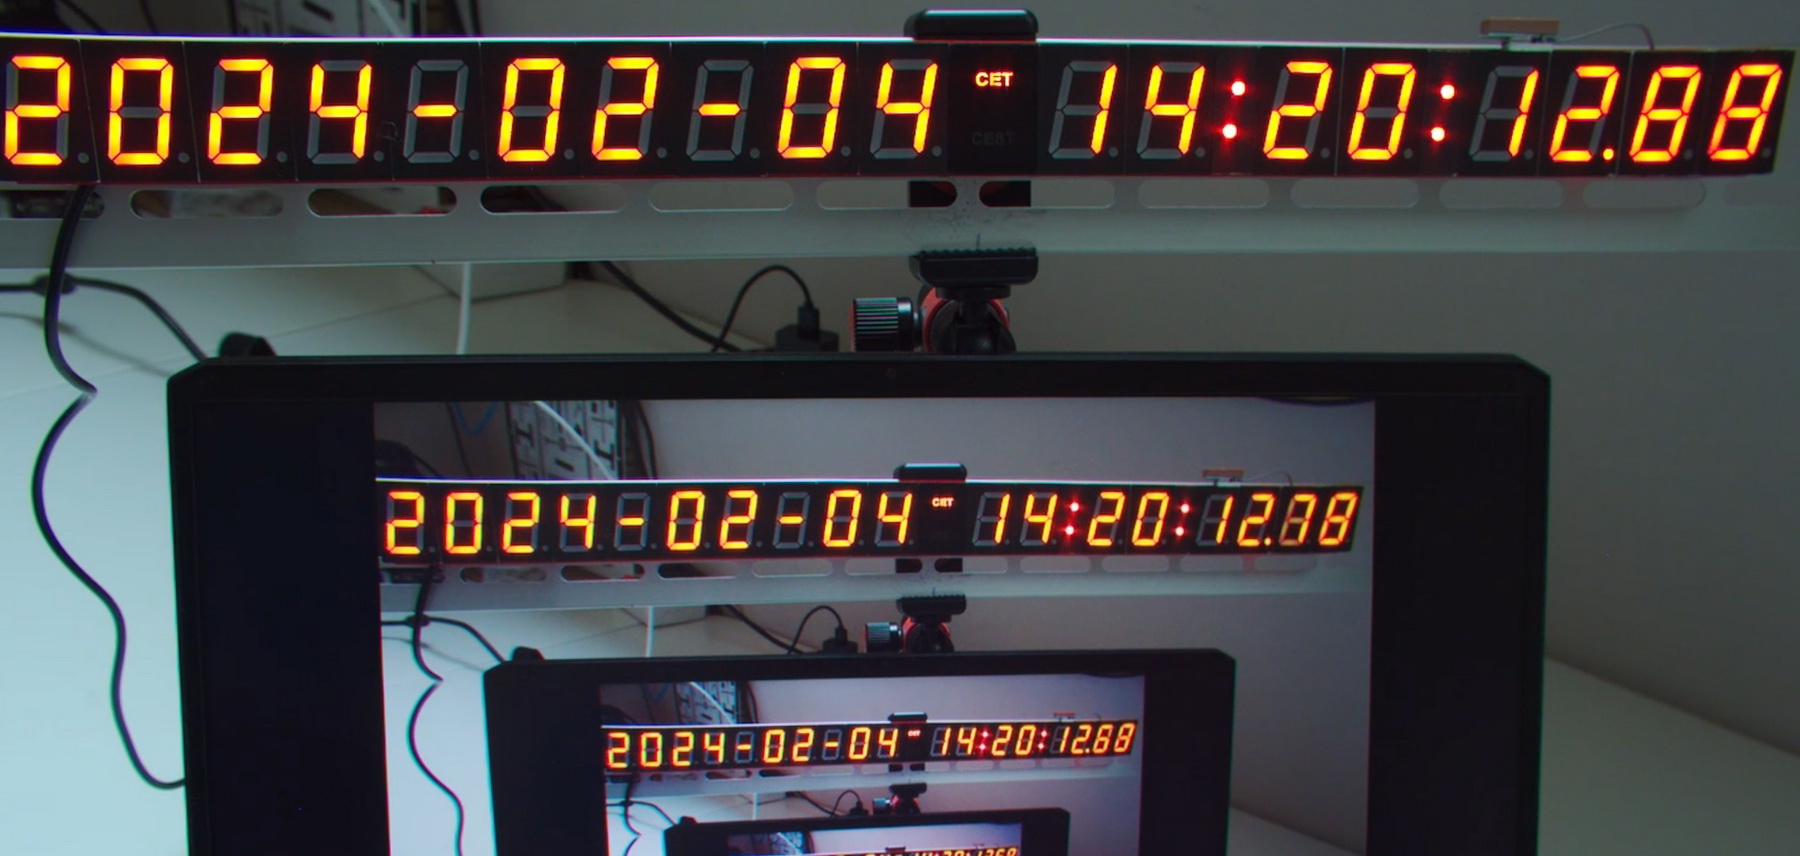
Place the clock above your laptop screen. Make sure that `farsight` application is running on your Jetson Orin devkit. To get the best results consider switching Jetson to MAXN power mode and running `sudo jetson_clocks` command. Run `imagebroker` application on the laptop (`imagebroker` executable is located in the <IFF_SDK_ROOT>\samples\02_export\build\bin directory). Point the camera at a slight angle at the laptop screen and the clock above it, so that you can see several nested images one inside the other, as shown in the image below:
Now you can proceed directly to measuring glass-to-glass latency. To do this, freeze the `imagebroker` application screen by pressing “Space” key on your laptop. You will see on your laptop screen an image like this:
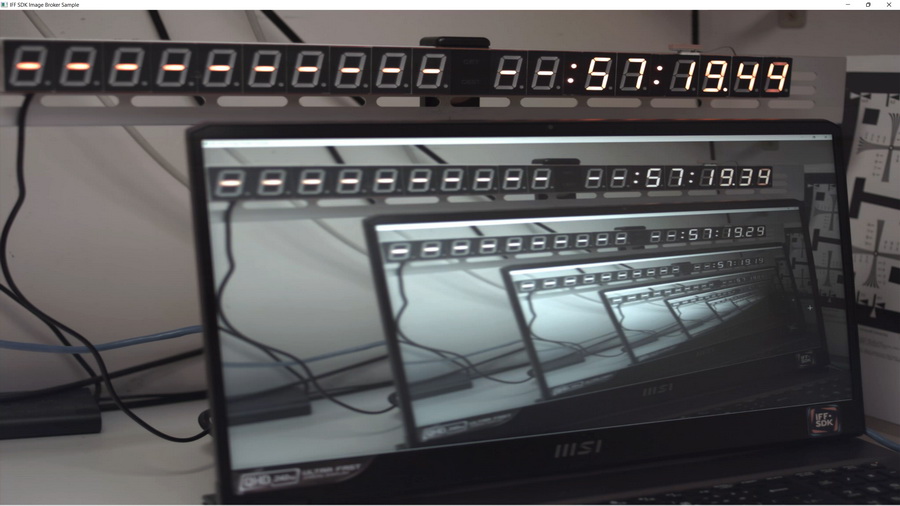
On this screenshot you can see 100ms glass-to-glass latency
The difference between the top two consecutive timestamps on the screen is our real glass-to-glass latency measured with 10 milliseconds accuracy.
You can see more detailed latency measurement results for various configurations here. If you have any questions, feel free to contact us at usual places, like support@mr-technologies.com email.